Some video clips, slowed down to a quarter speed ....
... as they are constantly rushing about. This time I was able to use the above stage lighting which gives somewhat clearer views of the activity. My first thought on identification was Ostracada but now I am not so sure, Thay may be Cillates.
PS. Just been identified by Izmi Gigavista from Fort Hays State University as being a cillate known as Colpoda.

Showing posts with label Moss. Show all posts
Showing posts with label Moss. Show all posts
Wednesday, 9 July 2025
Tuesday, 24 June 2025
Life in Moss
I picked up a bit of moss kindly thrown on my path by a bird. It was placed in a small petri dish and soaked with boiled tap water for a few hours:

Then the moss was removed and squeezed to drip some of the moisture in another dish. Now a small amount of that liquid was picked up in a pipette and a drop or two placed on a microscope slide. With the naked eye only a few minute dots could be seen in the water. After adjusting the lighting the sample was viewed to see what microscopic life could be found and photographs taken. Here are a few:
A nematode:

Probably a rotifer:

An as yet unidentified creature:

I must try this again with some moss from a different place.
Then the moss was removed and squeezed to drip some of the moisture in another dish. Now a small amount of that liquid was picked up in a pipette and a drop or two placed on a microscope slide. With the naked eye only a few minute dots could be seen in the water. After adjusting the lighting the sample was viewed to see what microscopic life could be found and photographs taken. Here are a few:
A nematode:
Probably a rotifer:
An as yet unidentified creature:
I must try this again with some moss from a different place.
Tuesday, 31 March 2015
Measuring with the Microscope + Video Camera
I kept looking at the calibration slides for microscopes and finally decided to invest in one.

It has dots of various sizes and, most useful for me, in the centre is a circle which contains a cross 1 mm across with a scale marked every 1/10 mm and every 1/100 mm.
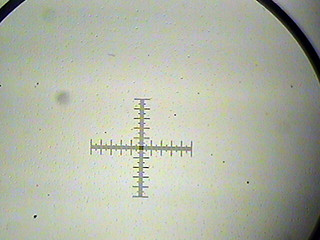
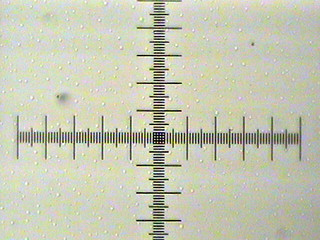
By taking snapshots of that with each objective lens I could work out the actual size of each shot.
Taking a piece of moss from a hanging basket:


Viewing it under my lowest magnification:

I now know from photographing the calibration slide that the photo is showing a 3.3mm view across with that objective lens.
It has dots of various sizes and, most useful for me, in the centre is a circle which contains a cross 1 mm across with a scale marked every 1/10 mm and every 1/100 mm.
By taking snapshots of that with each objective lens I could work out the actual size of each shot.
Taking a piece of moss from a hanging basket:
Viewing it under my lowest magnification:
I now know from photographing the calibration slide that the photo is showing a 3.3mm view across with that objective lens.
Sunday, 3 May 2009
A bit of Moss
Yesterday was a pain computer wise so today could only get better. I had decided to replace my old LCD monitor with a new wide screen one. It duly arrived and I followed the instructions and connected it up. It worked OK but the graphics card would not give me a wide screen choice so everything was stretched sideways. It took three hours to find the correct up to date driver from the manufacturers site and even that took a tortuous route to get working but in the end all was well. Come back Atari, all is forgiven.
Some days ago when I was pottering round the garden I spotted moss growing on the rotting remains of a wooden post in a 2"x2" Metpost.

At first the idea was just to get a photo for the record but then I wanted to get a closer look. A while ago I bought a second hand Digital Blue USB microscope as I had seen reasonable write ups of its ability. It is really classed as a toy but for certain things it works fairly well. For focus the stage moves up and down but as everything is plastic it can stick and suddenly jump past the optimum focus point so you have to keep going up and down until it stops in the right place.

Another annoying disadvantage as far as I am concerned is the way it changes the screen to a lower resolution. Not a problem in itself as it brings back the original resolution when you exit the program - but - in lowering the resolution Windows then shuffles my desktop icons about and I like them in certain groups on the screen.
So, I pulled a small piece of the moss and took a photo with the Canon which shows all the parts which go up to make this particular moss. The moss is about 40mm tall, just under 2 inches. On backyardnature.net I found this drawing which labels the various parts nicely.


Now to the Digital Blue microscope which has three settings for magnification. Here is the leaf section at 60x magnification which shows some of the cell structure.

Here are some capsules at 10x magnification ....

....and a couple of views of a capsule at 60x magnification.


The capsules only appear at a time of year when the conditions are right for the moss to reproduce and contains the spores for starting new plants. The rest of the year only the leaf section of the moss will be seen.
I spent ages trawling the net trying to identify which moss this is - to no avail. My closest guess at the moment is that is may be in the group Dicranella but that was as far as I could get.
This microscope also has a 200x magnification which personally I find gives poor results, especially on 3D subjects like this but may well be better for looking through thinly sliced specimens but I don't think the optics are really up to the job.
Some days ago when I was pottering round the garden I spotted moss growing on the rotting remains of a wooden post in a 2"x2" Metpost.
At first the idea was just to get a photo for the record but then I wanted to get a closer look. A while ago I bought a second hand Digital Blue USB microscope as I had seen reasonable write ups of its ability. It is really classed as a toy but for certain things it works fairly well. For focus the stage moves up and down but as everything is plastic it can stick and suddenly jump past the optimum focus point so you have to keep going up and down until it stops in the right place.
Another annoying disadvantage as far as I am concerned is the way it changes the screen to a lower resolution. Not a problem in itself as it brings back the original resolution when you exit the program - but - in lowering the resolution Windows then shuffles my desktop icons about and I like them in certain groups on the screen.
So, I pulled a small piece of the moss and took a photo with the Canon which shows all the parts which go up to make this particular moss. The moss is about 40mm tall, just under 2 inches. On backyardnature.net I found this drawing which labels the various parts nicely.
Now to the Digital Blue microscope which has three settings for magnification. Here is the leaf section at 60x magnification which shows some of the cell structure.
Here are some capsules at 10x magnification ....
....and a couple of views of a capsule at 60x magnification.
The capsules only appear at a time of year when the conditions are right for the moss to reproduce and contains the spores for starting new plants. The rest of the year only the leaf section of the moss will be seen.
I spent ages trawling the net trying to identify which moss this is - to no avail. My closest guess at the moment is that is may be in the group Dicranella but that was as far as I could get.
This microscope also has a 200x magnification which personally I find gives poor results, especially on 3D subjects like this but may well be better for looking through thinly sliced specimens but I don't think the optics are really up to the job.
Subscribe to:
Posts (Atom)
