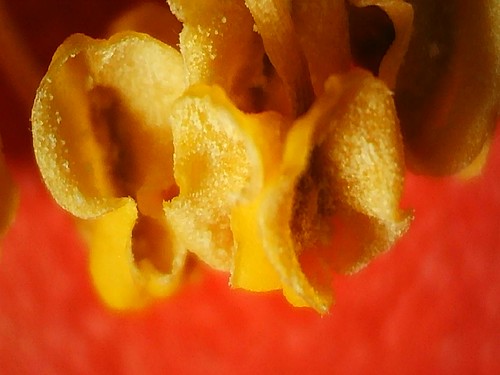
Whilst emptying some bits in one of the wheelie bins I noticed what, at first glance, I thought was a tiny wasp. It wasn't moving so I assumed it had recently died and collected it to put under my LCD Microscope. Read about that here
The wasp like insect was quite small at about 10mm long.
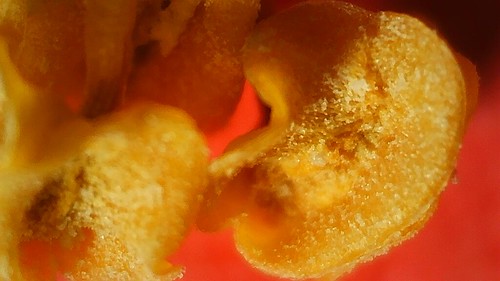
Oh-ho ... what is that extra part jutting out near the lower eye?
Let's turn the insect over and take a closer look ....
That looks to me like the type of proboscis used to puncture skin and have a free drink of my blood. Pretty sure that what I have here is a mosquito though so far I haven't been able to identify which species it is. Any ideas??
Bit of a rush first thing. This morning Penny had her blood pressure checked. We were booked in for 9.10 a.m. so I left here about 8.30 and took the main roads for a change. Mainly as they were more likely to be ice free and they were. It took a while for the vet to get a reliable BP result while I sat in the car outside twiddling my thumbs. Result - all back to normal levels so we continue with the four tablets every day. Fortunately they are all taken in one session. As they are very small they are easily hidden in her favourite food. Next BP check will be in three months time.
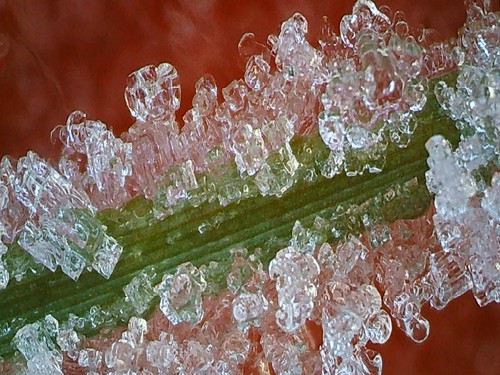
When we returned I could see there was plenty of frost in the areas where the Sun doesn't reach this time of year so I put some under the microscope. A couple of shots:
This time I not only remembered to choose the finest resolution but also chose a 2 second delay between pressing the button and the photo being taken. That gives any vibration time to settle down.
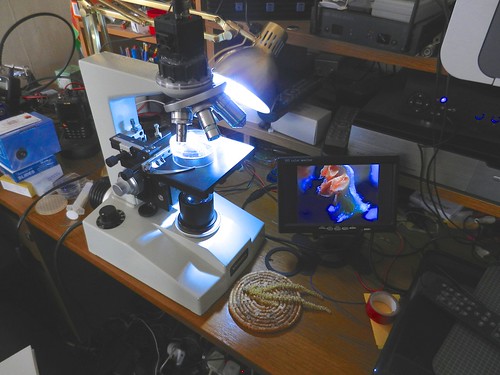
It seems yonks since I set up the LCD microscope for a session.
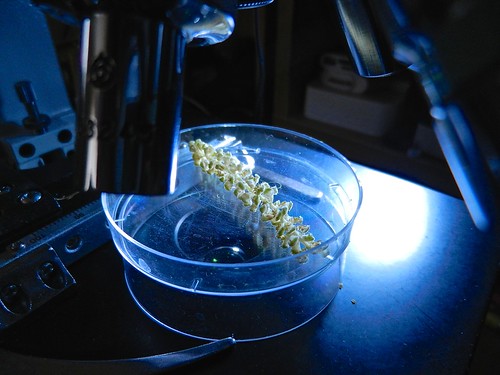
As a frost was forecast for this morning I thought it would be different to see the frost close up instead of pretty photos of frosty plants. To have the longest possible time to adjust the microscope focus before any frosty object thawed I set things up in the unheated greenhouse. The microscope being powered by a 5V power bank. Even so the crystals started to melt almost immediately. Anyway here are a few captures at varied magnification:
There were a few crystal spikes but they melted too fast to get a decent photo.
I went out to catch a couple of pill bugs / woodlice. I managed that but also captured this insect at the same time. I am 99% sure I have the identification correct by the colouring, markings and especially the U shaped marking at the rear end. Size - about 4mm long. I think it is a springtail. It certainly proved it could jump a couple of times. I am pleased with this video as I managed to film it without the lid on the container so nothing to distort the result.
Also I put the clips together using Wondershare Filmora 9. It produced a proper 1080HD result unlike iMovie which seemed to give 720 in spite of the original video resolution. Fancier titles as well!
I love the way the markings on the back of its head look like a face.
What kept it busy while I videoed? I had put a drop of Golden Syrup to interest a couple of ants earlier on. (Thanks for the hint Adrian). I had wiped most of it off but the insect found a thin smear on the bottom of the dish.
I went out looking for a pill bug. Normally they are everywhere but this time they all remained hidden. Par for the course. Then I remembered the position of an ant nest so spent ages trying to persuade one to stay in the dish I had taken out. Nippy little blighters in more ways than one. In the end I managed to capture one and it was only when I had the dish under the microscope I found I had also caught a couple of other creatures.
So, we have an ant and what appears to me to be a mite. It was smaller than a red spider mite, hardly the size of a speck of dust and only just viewable with the naked eye. What the creature that reminds me of a hermit crab is I have no idea as yet. It was even smaller than the mite. The zoomed section was done in processing the video. All other parts are exactly as taken by the microscope. The only addition was using an external lamp to help with illumination.
One thing to note is the build in LEDs can reflect back in the camera lens but the microscope is designed so it can be tilted to get round this.
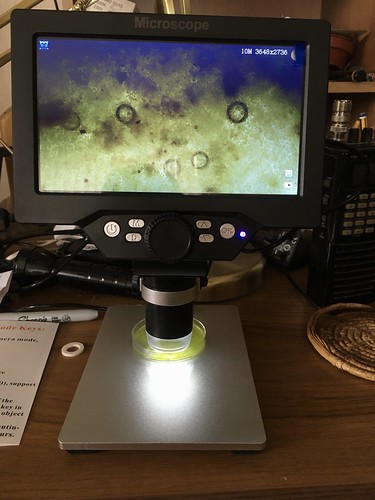
After some thinking and research I decided to invest in one of these:
It has a built in 12M pixel camera and the ability to zoom anywhere from 1 to 1200 times.
There are LEDs round the camera lens and objects are shown on a 7 inch LCD display.
The highest magnification is not enough to see extremely small life forms such as those found in ponds but is plenty to get a close look at small everyday objects.
There is a slot for a micro SD card so still photos of up to 12M pixel resolution can be saved.
Not only that but it can save 1080 HD video. Power is provided by a 5V wall wart. If the microscope is connected to a computer USB port then the photos and videos can be transferred from the SD card.
The actual unit:
I have some clear plastic petri type dishes and am hoping to capture the occasion mini beast to put under the microscope. I went out hunting yesterday but the weather was so bad all sensible bugs were staying hidden. I did spot a small seed caught in a spider's web so grabbed that.
You can just about see it on the top edge of this dish (the nearby washer is about 18mm diameter)
A couple of untouched photos taken with the microscope
and a close view of a Chinese Lantern plant seed case
So far the only niggly thing I have found is that it doesn't remember the chosen photo resolution when the power is switched off. I have to go in the menu each time I switch it on to set the highest resolution.
Watch out ladybirds and pill bugs. I'm looking for you!
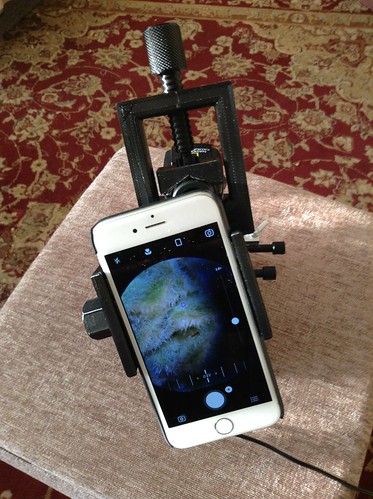
a partly universal fitting to add a phone (camera) to the microscope.
It was to replace the one which came with the microscope
Whilst being very adaptable as far a suiting a vast range of cameras I was never happy with the idea of suction cups as a method of holding it in place. I did once have my iPod slide off.
Unfortunately the replacement design I had downloaded and printed out was
a) fragile - I snapped one bit trying to fit it together.
b) it didn't suit the iPhone 6s with its corner positioned camera.
probably fine with phones with a camera nearer half way across their body.
I had a look round on the Thingiverse site and found another design which looked a better bet.
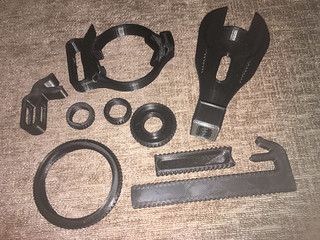
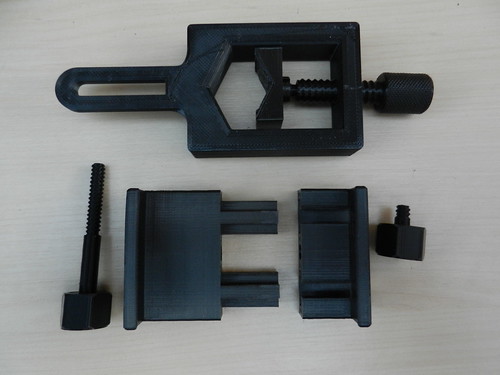
Here are the parts once printed out
I had already fitted together the three parts which make up the bit at the top of the photo.
On the V shaped section there is a ball and socket joint in which the end of the screw fits. This is three sections around the ball. One of those snapped as it was too close a fit but everything still holds in place.
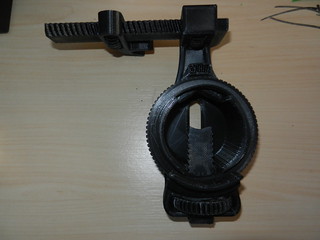
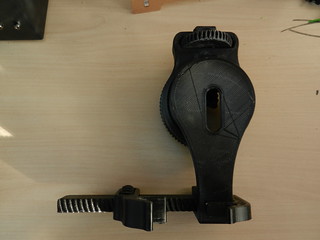
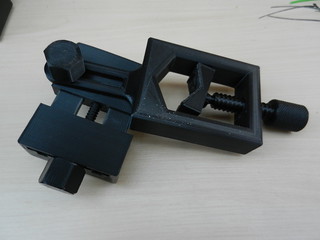
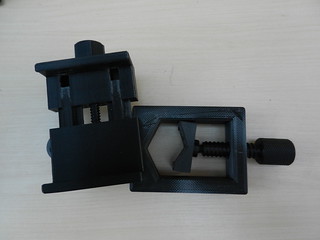
All the parts assembled
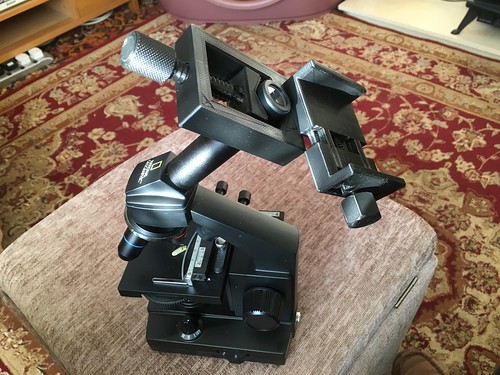
Fitted to the microscope
With camera firmly held in place
Fortunately my phone has an added cover over the back and sides which protects the volume and power buttons or the clamp would press and activate them. I think I will add some of the old style adhesive foam strip we used to use for sealing gaps in wooden window frames years ago. That should cushion any possible pressure on the phone's buttons.
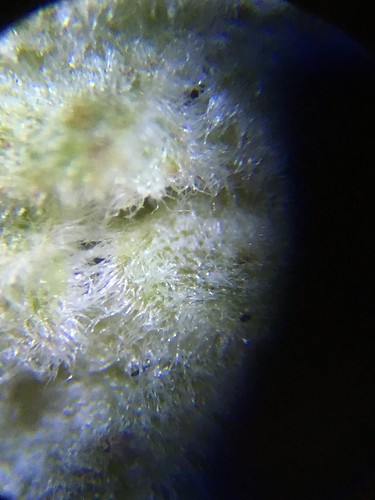
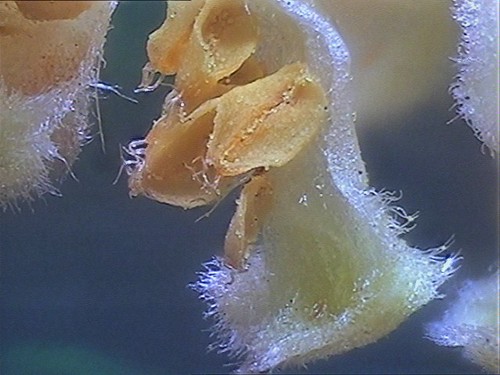
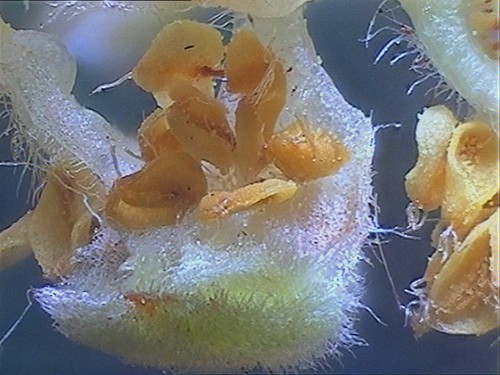
A photo of the hazel catkin with this set up
I did have problems with keeping the items stuck on the printer bed to start with. I think it was the overall low temperature in the unheated conservatory. Things were cooling down too fast. Increased the bed temperature from the usual 60C to 63C and the extruding temperature from the usual 200C to 205C and all worked perfectly.
A short video of the printer at work
I toned down the sound. The printer has four cooling fans and four stepper motors which can be noisyish at times.
My grateful thanks to user 'falconphysics' for publishing the design on Thingiverse.
The common experience of all microscopists confirms the assertion made by Dr. Goring, that the most fascinating objects are living creatures of sufficient dimensions to be easily understood with moderate magnification ; and in no way can objects of this description be so readily obtained, as by devoting an occasional hour to the examination of the little ponds which are accessible from almost any situation.
The above quotation is from Marvels of Pond-Life by Henry J Slack F.G.S., second edition published in 1871.
In the same drop of water as the rotifer shown a few days ago was this almost transparent blob which appears to be an amoeba. The video was tinted to show it up better. No sound track this time.
This is a single cell creature with a nucleus (the dark dot) contained in a membrane. It captures its food by changing the shape of its membrane, surrounding and assimilating it. An activity I haven't managed to see as yet.
I count myself lucky to have spotted it. I have examined various drops of water over the past few years without seeing one. Optical magnification was around 400x.
Spent a while experimenting capturing microscope video clips on the iPhone6s.
The Apple photo app does a reasonable job but I found the free version of 'Moment - Pro Camera' gives plenty of manual control over still and video recording. The second section of the video was shot in 4K. Uploaded as 1080p
I put one small drop of water, from some old rain water which was full of green algae, on a concave blank slide. The largest living thing seen was the rotifer - still far too small to see with the naked eye. Magnification was around 250 times.
Colour fringing at the edge of the video can have two causes:
Phone not perfectly aligned.
The standard for objective lenses says that the centre 60% should be sharp but the outer 40% will show signs of softer focus and possible colour fringing.
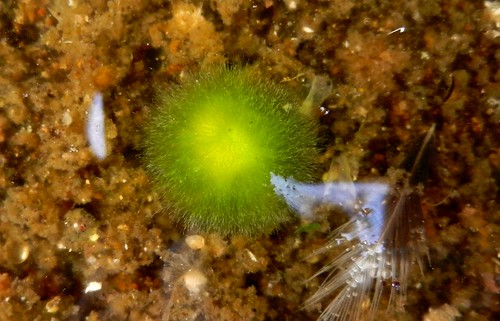
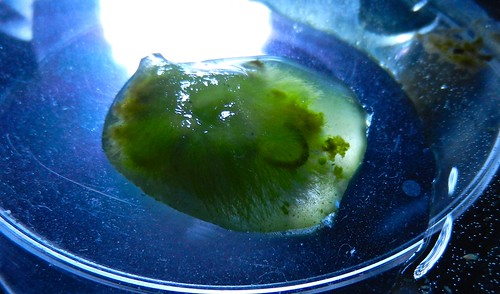
When I went to clean out the bird bath I noticed three green mounds in the water.
This was the largest at about 20mm (3/4 inch) across:
I decided it was time to have another microscope session to see what, if any, life forms were living in it. To that end I transferred the largest splodge to a plastic dish:
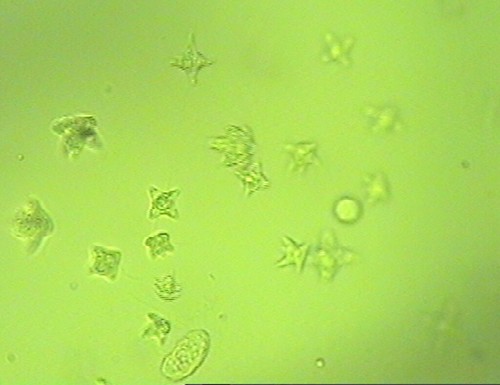
I had hoped to see a few bits of microscopic life but was blown away by their sheer numbers in such a small place as you will see later in the video:
A screen grab from the video. Each life form is less than a tenth of a mm in size.
I think the star shaped objects are Staurastrum:
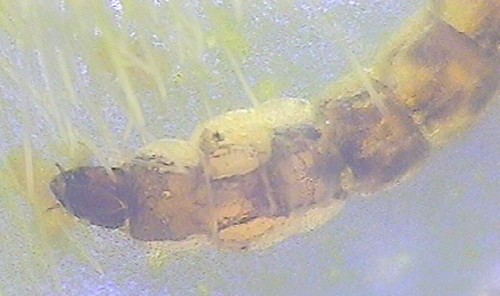
Another screen grab of a larger life form, about 10mm long and 1mm thick, possibly a midge larva. All the tiny pale specks are the things shown in the first screen grab:
On to the video:
Have a great weekend observing the wildlife around you, whatever its size.
At the time of making this video it had been 16 days since the frogs spawned. Many of the tadpoles were at the wriggly stage. They were free of the spawn but not yet swimming.
I collected a few in a dish to have a closer look under the microscope. I hadn't expected to actually see through the gills and watch them working, circulating the blood with each heart beat to extract oxygen from the water. I am still amazed how well the video camera is working on the microscope:
Once filmed the tadpoles were returned to the pond.
A last minute video clip from last night. Just as I was about to turn everything off I spotted a Hedgehog helping itself to the crushed, unsalted peanuts in the Hedgehog House:
Obviously it wasn't the least bit bothered by the six white LEDs as it had a good close sniff at the camera.
Have a great weekend observing the wildlife around you.
Well, to be precise a Vorticella. A microscopic creature which looks a bit like an upside down bell. The top, the mouth opening, is surrounded by cilia which rapidly wave up and down in turn. This helps to suck minute food particles towards the opening. On the video they are moving so fast that at first glance I thought the top was rotating. From the bottom of the Vorticella is a stalk which it can use to attach itself and also coil it like a spring to rapidly move out of the way of danger.
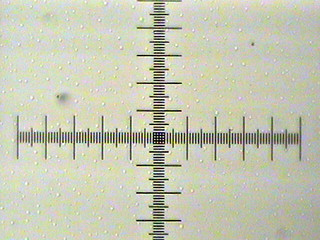
By photographing the slide scale at the same size as the video view and making the background transparent it was possible to add the scale on the video. I tried for ages to get the background transparent in Affinity Photo but the result was poor so ended up going to my old copy of Elements which did it in three quick operations. Magic Wand to surround the black markings, hit delete to make the background see through. Save as .png. Job done!
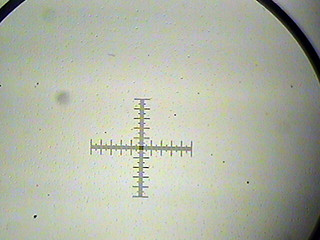
I kept looking at the calibration slides for microscopes and finally decided to invest in one.
It has dots of various sizes and, most useful for me, in the centre is a circle which contains a cross 1 mm across with a scale marked every 1/10 mm and every 1/100 mm.
By taking snapshots of that with each objective lens I could work out the actual size of each shot.
Taking a piece of moss from a hanging basket:
Viewing it under my lowest magnification:
I now know from photographing the calibration slide that the photo is showing a 3.3mm view across with that objective lens.
While the old video cameras were working quite well they don't have great resolution, either 360 or 480 TVL (TV lines). Finding a replacement was quite difficult. Most video cameras seem to have built in IR lighting. Fine for surveillance but useless for my purpose. Eventually I found a German company selling a small basic camera with a resolution of 700 TVL. The 1/3 inch sensor has 976 x 582 pixels, low by modern standards but there is no point in going too high as the definition is also limited by the optics and the video grabber.
This is now fitted to the top of the microscope.
I had to fill in some gaps with hot melt glue. This holds it firmly in place and, importantly, makes an air tight seal to stop dust penetrating to the inside of the objective lenses or the camera sensor. Disappointingly the camera is not totally free from blemishes at low lighting conditions but much better than my old cameras.
The pictures look good on the small monitor I use. Unfortunately there is some degradation in capturing the photos on the MacBook. Next job will be to look around for a better quality video grabber.
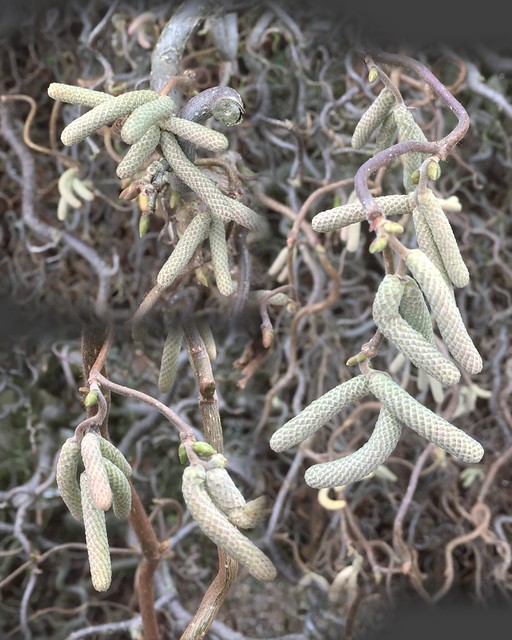
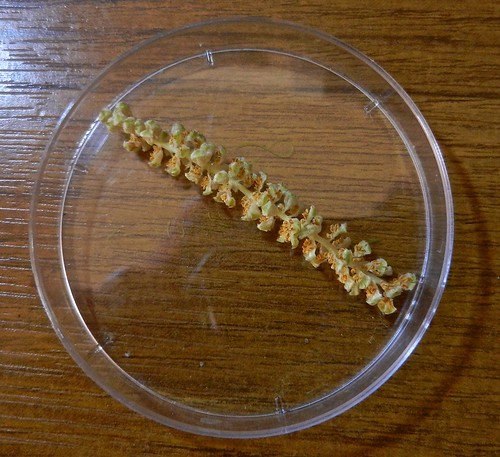
A quick trial grabbing some photos of a corkscrew hazel catkin at minimum magnification.
The dish is 55mm across.
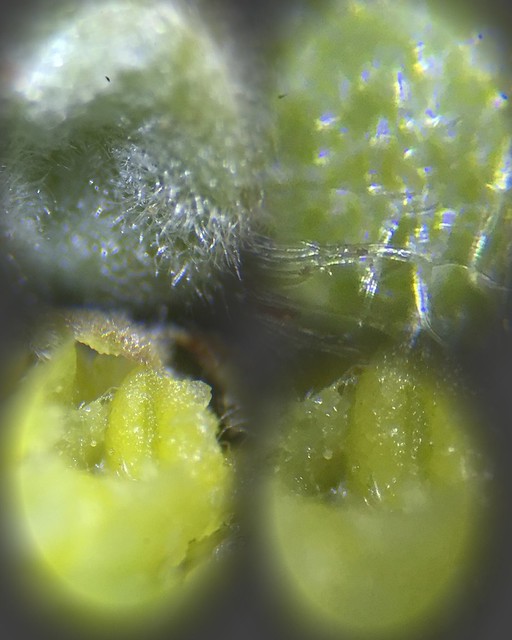
A couple of trials taking 20 or more focus stacked shots processed using Zerene Stacker.